3 PRODUCTS FOR A PERFECT BASE


Ultimamente nuovi prodotti sono entrati a far parte della mia makeup routine, complici un po' le recensioni lette su altri blog, un po' la curiosità di provare qualcosa di nuovo, un po' le offerte tentatrici dei siti on line. 
Il fondotinta L'Oréal Infaillible 24 h-matt è uno di questi. L'ho comprato dopo aver terminato il mio amatissimo fondotinta liquido di Shiseido e dopo aver letto parecchie recensioni positive, così, alla fine, ho ceduto anche io. 
Il suo finish è assolutamente opaco, non c'è neanche bisogno di fissarlo con la cipria (almeno su di me) e la sua durata è davvero long lasting: non cola, non scivola, rimane intatto tutto il giorno. Ha una coprenza modulabile, da media ad alta anche se bisogna stare attenti: più strati si applicano, più si corre il rischio di ottenere un effetto "mascherone". 
E', inoltre, un prodotto non comedogeno e questo lo rende perfetto per le pelli grasse e con problemi, poichè non ostruisce i pori.
Sconsigliato, invece, a chi ha la pelle secca perchè eventuali pellicine vengono inesorabilmente evidenziate. Ecco perchè io metto sempre molta crema idratante prima ;)
Altra cosa che mi piace è la gamma di tonalità: ci sono parecchi colori intermedi tra la tonalità più chiara e quella più scura e tutti hanno un sottotono piuttosto neutro. Io ho scelto la n. 22 beige èclat, che si uniforma perfettamente al mio tono di pelle. 
Insomma, ottimo fondotinta! Uno dei migliori che abbia mai provato - e ne ho provati tanti! 
Passiamo poi al correttore, o meglio, ai correttori. 
Ne uso sempre due: uno più secco e color salmone, come base, e uno più chiaro e leggermente più liquido, sopra.
E' importante utilizzare prima un correttore sui toni del rosa/salmone/pesca - a seconda dell'intensità delle nostre occhiaie - perchè queste tonalità neutralizzano il blu dell'occhiaia e uniformano il tono della pelle. Solo successivamente possiamo illuminare e alleggerire lo sguardo con un correttore di uno, due toni più chiaro. 
La mia base è lo Stick evolution concealer di Kiko - altra new entryin una tonalità leggermente aranciata (n.03). Secco ma non troppo, si stende bene e si sfuma facilmente; ottima durata e non va nelle pieghette. Dopodichè applico il liquid concealer di Wycon nella tonalità 100 giallo, creando un triangolo che va dall'occhio fino al naso e agli zigomi e sfumando bene. Lo adoro! La sua durata e la resa sulla pelle sono eccezionali, al pari di altri correttori molto più costosi! 
Quali sono i vostri tre prodotti indispensabili per la base?  

ENG
Lately some new products have been added to my makeup stash, complicit some positive reviews on other blogs, the desire to try something new and a lot of tempting offers from online beauty stores. 
L'Oreal Infaillible 24 h-matt foundation is one of them. I bought it after I finished my beloved Shiseido liquid foundation and after reading many positive reviews so, in the end, I gave in.
Its finish is absolutely opaque, there is also no need to fix it with the powder (at least for me) and it' s very long lasting: it doesn't fly away and it remains intact all day long. 
Its coverage is medium to high though you have be careful: more layers you apply, the more you run the risk of getting a "mask" effect. It's also a non-comedogenic product and this makes it perfect for oily and acne-pron skins as it doesn't clog pores.
Not recommended for dry skins because it highlights rinds and chapped skin. That's why I put a lot of moisturizer before ;)
Another thing I like of it is the range of shades: there are several intermediate colors between the lighter and the darker shades and all them have a rather neutral undertone. I chose No. 22 Beige Eclat, which conforms perfectly to my skin tone.
In short, a very good foundation! One of the best I've ever had - and I've tried lots!
Moving to concealer, or rather, concealers.
I always use two types of concealer: one rather dry and slightly orange, as a base, and one lighter and slightly more liquid, above.
It 'important to use a pink/peach tones concealer first, because these shades neutralize the blue tone of dark circles and even out skin tone. Only then we can brighten and lighten the eye area with a lighter concealer.
My base is the Stick evolution concealer from Kiko - another newcomer - in a slightly orange tone (n.03). 
Dry but not too much, it spreads well and it's easy to blend. Also its durability is excellent.
Then I apply liquid concealer from Wycon, in the shade yellow, creating a triangle that goes from the eye to the nose and cheekbones and blending it well. I love it! It's so long lasting and its yield on my skin is outstanding, like other much more expensive concealers!
What are the three essential products for your base?


KIKO DOUBLE TOUCH LIPSTICK - review

Chi mi segue su Instagram saprà che qualche settimana fa ho fatto un piccolo ordine (be', non così tanto piccolo xD) su Kiko, approfittando di una delle sue meravigliose promo. 
Tra i prodotti che ho acquistato, ovviamente, non poteva mancare un rossetto e siccome volevo provare qualcosa di nuovo e diverso dal solito lipstick opaco, la mia scelta è caduta sul Double Touch Lipstick, nella tonalità 112, rosso ciliegia

Si tratta di un rossetto liquido in due step: da una parte la base colore e dall'altra il lucidalabbra - come il Provocalips di Rimmel, per intenderci (di cui vi ho espresso tutto il mio disappunto qui) ma mooolto migliore! 
Partiamo dal colore - leggermente più chiaro di come l'avevo immaginato, diciamo che somiglia più a un rosso fragola - pigmentato e coprente già alla prima passata. Una volta asciutto, il colore rimane completamente matt sulle labbra, ma davvero confortevole e per nulla appiccicoso, tanto che può essere usato anche senza il top coat (a differenza del Provocalips -.-)
Per quanto riguarda la sua durata, di certo non sono le 10 ore riportate sulla confezione, ma 5-6 le sopporta benissimo, soprattutto se non si mangia. E' proprio a contatto dei cibi, infatti, che la tinta comincia a svanire in maniera disomogenea e quindi è necessario rimuoverlo completamente e riapplicarlo. Operazione agevolata dal pennellino rigido e dalla punta tondeggiante, che richiede tuttavia una buona dose di precisione: trattandosi di una tinta, eventuali errori non sono facilmente rimediabili. 


Piccolo consiglio: durante l'applicazione, evitate di chiudere e unire le labbra (come si farebbe con un normale rossetto, per uniformarlo) ma lasciatelo asciugare tenendo sempre le labbra leggermente aperte. In questo modo si evitano linee e segni di asciugatura che, altrimenti, rimarrebbero per tutta la durata del rossetto.
Molto facile anche rimuoverlo: basta una semplice salviettina struccante e non è necessario strofinare (come per il Provocalips -.-)
In definitiva, il mio parere è super positivo e, se proprio vogliamo dargli un voto (come fa Clio xD) il mio è di 8 su 10 ^-^
E voi, l'avete mai provato? Qual è il vostro rossetto liquido preferito del momento? 

Senza top coat

ENG 
If you follow me on Instagram you will know that a few weeks ago I made a small order (well, not so much small xD) from Kiko, taking advantage of one of its wonderful promo.
Among the products I bought, of course, a lipstick could not miss and since I wanted to try something new and different from the usual matte lipstick, my choice fell on the Double Touch Lipstick in the shade #112, cherry red.
It's a liquid lipstick in two steps: one is the base color and the other is the lip gloss - like the Provocalips from Rimmel (of which I have expressed all my disappointment here) but waaay better!
Starting from the color - slightly lighter than I had imagined, we say that it's more like a strawberry red - pigmented and opaque already at the first swipe. Once dry, the color remains completely matt on lips, but really comfortable and not at all sticky, so that it can also be used without the top coat (unlike the Provocalips -.-)
Certainly it doesn't last 10 hours, as mentioned on the packaging, but it copes at least 5-6 hours very well, especially if you don't eat. Because of food, in fact, the tint starts to fade unevenly and therefore it is necessary to completely remove and reapply it. This step is made easy by the brush with rounded tip, but it requires a good amount of accuracy: it's a lip tint, mistakes can not be easily fixed.
Small tip: during application avoid to close and merge the lips (like you would do with a normal lipstick) and let it dry keeping your lips slightly open. In this way you avoid lines and signs of drying which, otherwise, would remain for the entire duration of lipstick.
It's also very easy to remove: just a simple wipe and you don't need to rub (as for Provocalips -.-)
Ultimately, my opinion is super positive, and if we really want to give him a score, so mine is 8 out of 10 ^ - ^
What about you, have you ever tried it? What is your favorite liquid lipstick of the moment?

MY SUMMER FASHION WISHLIST

Con l'arrivo della primavera e delle belle giornate uno dei miei passatempi preferiti è diventato quello di spulciare tra articoli di moda e app come Pinterest e Lookbook per scoprire i trend più cool dell'estate e, soprattutto, cercare nuove ispirazioni per i miei outfit estivi. Già mi immagino una valanga di t-shirt stampate, vestitini e jumpsuit floreali, gonne lunghe e gilet di jeans, pantaloni capri e tanto tanto pizzo!
Ovviamente mi sono messa subito all'opera e ho già stilato la mia bella lista di must haves e mentre curiosavo tra i vari negozi online, sono capitata su Ozspecials, un sito di abiti femminili e lingerie davvero sorprendente!
Sono principalmente due le caratteristiche che mi hanno colpito di questo e-store: per prima cosa le spese di spedizione, gratuite in tutto il mondo; e successivamente i prezzi degli articoli: tutti al di sotto di 9,99 $!!
Vestitini in pizzo, t-shirts con carinissime stampe color pastello, top all'uncinetto, costumi da bagno originalissimi, e poi ancora pantaloni, gonne, leggins e calzini simpaticissimi (*-*), oltre che completini intimi in raso e pizzo davvero molto sexy e particolari! Lasciate che vi mostri la mia wishlist e poi ditemi cosa ne pensate!

ENG
With the early spring and good weather, browsing through fashion posts and apps like Pinterest and Lookbook became one of my favorite hobby, in order to discover the coolest summer trend and mostly to seek new inspirations for my summer outfits. I already imagine an avalanche of printed t-shirts, dresses and floral jumpsuits, long skirts and denim vests, capri pants and so much lace!
Obviously I immediately got to work and I already made my wishlist and while snooping among the various online stores, I found Ozspecials, a truly amazing womens clothing and lingerie store!
There are two main features that have impressed me: first, free international shipping; and then, the item prices: no more than $ 9.99 !!
Lace dresses, cute pastel prints t-shirts, crochet tops, amazing swimwear, and pants, skirts, leggings and such adorable socks (*-*), as well as satin and lace intimates, so sexy! 
Let me show you my wishlist and let me know what do you think about!

1. Cartoon t-shirt - here
2. White Lace Dress - here
3. Floral Jumpsuit - here 
4. Folk Printed Shorts - here
5. Eyelash Printed T-shirt - here
6. Cat Socks - here
7. Minions Socks - here
8. Hearts Printed Nightwear - here
9. Blue High Waisted Shorts - here
10. Cross Deep v T-shirt - here
11. Lace Crocet Bra - here
12. Strapless Swimwear - here

Tra l'altro, il sito prevede anche la possibilità di rimborso se gli articoli non soddisfano al 100%!
Spese di spedizione gratuite, non più di 9,99 $ e soddisfatti o rimborsati, cosa si può volere di più?
Quali sono i vostri must haves per quest'estate?

Also, the site provides for the possibility of a refund if the items do not meet 100%!
Free shipping, no more than $ 9.99 and money back guarantee, what more could you want?
What are your must-haves for this summer?


BOHO IDEAS TO DECOR YOUR ROOM

Anti-conformista, anti-convenzionale, eccentrico, selvaggio, gipsy: solo solo alcuni dei significati della parola BOHEMIEN.
Uno stile di vita che può piacere o no.
Personalmente, mi affascina molto questo modo di essere, questa filosofia dallo stile così particolare, radicale, essenziale, caratterizzato da un apparente disordine che richiama un profondo legame con la terra e la natura che ci circonda, in ogni fase della sua esistenza.
Come sapete, ultimamente sto ri-progettando camera mia - che ha subìto dei danni a causa del maltempo di quest'inverno - e ho deciso che sarà tutta bianca, con tocchi di colore fucsia e rosa e qualche accento boho-chic. 
Basta davvero poco per dare ad una stanza quel tocco bohemien: un tappeto colorato; tessuti dalle stampe geometriche; oggetti in legno grezzo; cuscini; piume; acchiappa-sogni; fili di luci e qualche piantina grassa sparsa un po' qua e là. Oggi voglio condividere con voi alcuni dei progetti che ho realizzato.
L'altro giorno passeggiavo in riva al mare e, tra i pezzi di legno che le onde hanno ributtato sulla spiaggia durante l'ultima mareggiata, ne ho raccolto uno tutto contorno e levigato dall'azione instancabile del mare e degli agenti atmosferici, e l'ho portato a casa.
Ripensandoci, questo piccolo pezzo di legno deve averne fatta di strada! Chissà da quale foresta proviene e quale sia stato il suo percorso fin qui..così ho deciso che ne avrei fatto qualcosa. E così è stato!
Innanzitutto ho segnato, con una matita, i punti in cui andranno i chiodi (che devono essere a testa larga). Una volta fissati i chiodi ho usato un laccio annodato, da un'estremità all'altra, per appendere il porta collane al muro.  


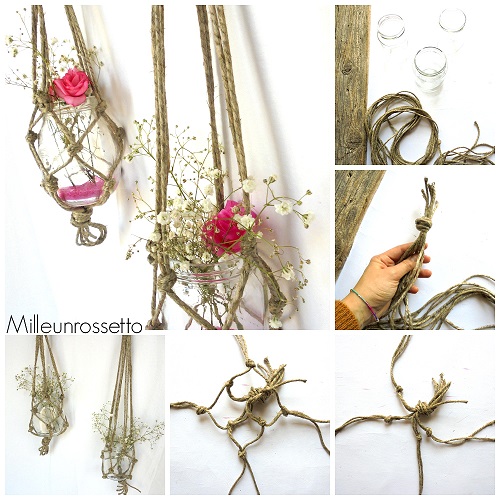
Adoro i vasi pieni di fiori e quando ho visto questi su Pinterest, non ho resistito!! Dovevo rifarli per camera mia! Il sistema per creare queste piccole "reti" che contengono il vaso è davvero semplice: spiegarlo potrebbe complicare le cose quindi vi lascio semplicemente alle immagini.
Dentro i vasi ho inserito della sabbiolina decorativa rosa, un po' d'acqua e la nebbiolina, che adoro! Qualche rosellina per richiamare il colore fucsia e il gioco è fatto ^-^ Ovviamente si possono inserire dentro anche delle candele, o delle piccole tea-light per rendere un po' più magica l'atmosfera. Me le immagino sospese anche tra i rami di un albero in giardino...*-*

Infine, il progetto di cui vado più fiera: l'acchiappasogni!
Ho utilizzato un cerchio in rame che avevo già - ma se ne trovano in plastica, legno, ecc.. (nei negozi per fai-da-te, tipo Brico) e, pazientemente, ho avvolto attorno ad esso del filo da ricamo colorato,  più e più volte, fino a rivestirlo completamente, fissandolo con della colla a caldo.
Dopodichè ho cominciato a tessere la rete: ho annodato un'estremità del filo da ricamo al cerchio e, procedendo in senso orario, ho teso il filo e l'ho annodato attorno al cerchio a circa 5 cm di distanza. Ho ripetuto il procedimento fino a tornare al primo nodo. Durante questi passaggi il filo non deve essere teso troppo.
A questo punto ho ripetuto il procedimento come prima, facendo passare il filo tra il primo e il secondo nodo, continuando così per ogni fila che si crea, fino ad ottenere una rete con un piccolo foro nel centro.
Ho annodato il filo sull'ultimo punto, fermandolo con un doppio nodo. 
Il colore è diverso rispetto a quello sotto perchè ne ho fatti due :)

E ora la parte più divertente: ho annodato all'estremità inferiore dei nastri colorati (bianchi e rosa), una treccia fatta con fili di perline, due fiorellini di carta, merletti e chi più ne ha più ne metta! Spazio alla fantasia! 
Infine, all'estremità superiore ho legato un pezzetto di filo creando una piccola asola a cui appendere l'acchiappasogni e voilà! 


 Che ne dite dello stile boho? Vi piace? 

ENG
Non-conformist, eccentric, unconventional, wild, gypsy: just some of the meanings for BOHEMIAN.
A lifestyle that you can love or not.
Personally, I'm very fascinated by this lifestyle and its unique, radical, essential design, featured by an apparent mess that recalls a deep connection with the nature around us, in every phase of its existence.
As you know, lately I'm re-designing my room - which was damaged  by the bad weather this winter - and I decided that it will be all white, with touches of fuchsia and pink and a few boho-chic accent.
So today I want to share with you some of the projects that I made. 
Just few things to give a room that bohemian touch: a colorful rug; geometric printed fabrics; rough wooden decorations; pillows; feathers; dreamcatcher; fairylights and some succulents here and there.
The other day I was walking by the sea and, among the driftwoods that waves have thrown back on the beach during the last storm, I picked up one and the I brought it at home.
Looking back, this little piece of wood must have come a long way! Who knows what forest is coming from and what was its path untill here..fascinated by all this, I decided that I would have turned that driftwood in something. And so it was:
First I marked the points where the nails (which should be broad-headed) would be. I fixed the nails and I used a string to hang it at wall. 
I love the pots full of flowers and when I saw these on Pinterest, I could not resist !! I had to redo them for my room! The way to create these small nets containing jars is really simple: explain it could be complicated so I will let the pictures speak
Then I put a little bit of pink sand, some water and some flowers inside the jars but of course you can also put in candles, or small tea-light to create a lovely atmosphere. I can imagine them hanging on the branches of a tree in the garden  * - *
Finally, the project of which I am most proud of: the dreamcatcher!
I used a copper circle that I already had - but you can find them in plastic, wood, etc, (in diy stores) and, patiently, I wrapped around it colorful thread, over and over again, until to cover it completely, securing it with hot glue.
Then I began to weave the net: I tied one end of the thread to the circle and moving clockwise, I stretched the wire and I knotted around the circle about 5 cm away. I repeated the process until I return to the first node. During these steps the wire should not be too tight.
At this point I repeated the procedure as before, by passing the thread between the first and the second knot, thus continuing for each row that is created, to create a net with a small hole in the center.
I knotted the thread on the last point, stopping him with a double knot.
And now the fun part: to the lower end I knotted some colored ribbons (white and pink), a braid made with beads strands, two paper flowers, lace and so on and so forth! 
I tied a piece of wire at the upper end, creating a small loop to hang the dream catcher at wall and that's the resul
What about the boho style? Do you like it?